Eye shader breakdown
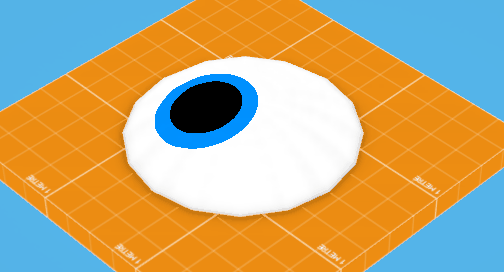
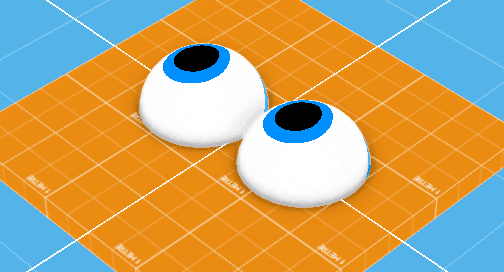
Back to projects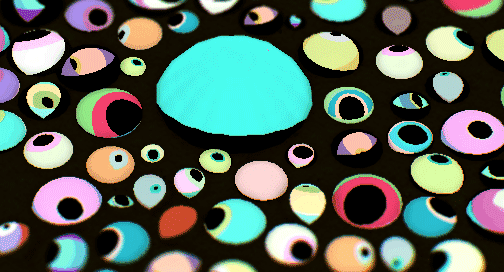 The final effect
There was a lot of interest in my last post about my water shader effect so I wanted to do another write-up about a much simpler shader that I use to draw eyes. It was created using C++, OpenGL and GLSL, but it should be easy to bring over the same ideas to whichever engine you’re using. Enjoy!
The final effect
There was a lot of interest in my last post about my water shader effect so I wanted to do another write-up about a much simpler shader that I use to draw eyes. It was created using C++, OpenGL and GLSL, but it should be easy to bring over the same ideas to whichever engine you’re using. Enjoy!
Goals of shader
 A simple example
With my current project I really want to be able to fill the world with all sorts of different weird characters, but as I’m just one person making hundreds of individual character assets is out of the question. To try and solve this I’m working on a few things that will allow me to combine different generalized pieces into a character entity. I’m also giving these pieces tons of modifiable parameters so that at runtime I can nudge the settings a bit and generate a bunch of different characters that look like they’re the same “species”.
Eyes are perfectly suited for this since (on Earth) they generally adhere to a circular shape, but within that boundary there are endless shape and color combinations. This post is about the fragment shader I wrote to render these different types of eyes.
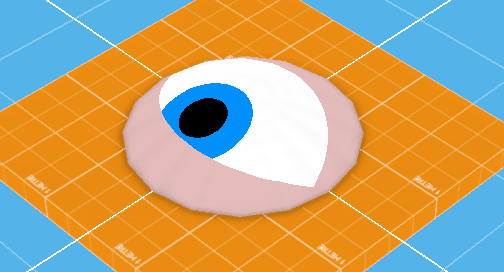
Note: All the examples shown in this post use a slightly convex circular mesh, but any texture mapped mesh will work.
A simple example
With my current project I really want to be able to fill the world with all sorts of different weird characters, but as I’m just one person making hundreds of individual character assets is out of the question. To try and solve this I’m working on a few things that will allow me to combine different generalized pieces into a character entity. I’m also giving these pieces tons of modifiable parameters so that at runtime I can nudge the settings a bit and generate a bunch of different characters that look like they’re the same “species”.
Eyes are perfectly suited for this since (on Earth) they generally adhere to a circular shape, but within that boundary there are endless shape and color combinations. This post is about the fragment shader I wrote to render these different types of eyes.
Note: All the examples shown in this post use a slightly convex circular mesh, but any texture mapped mesh will work.
Shape drawing
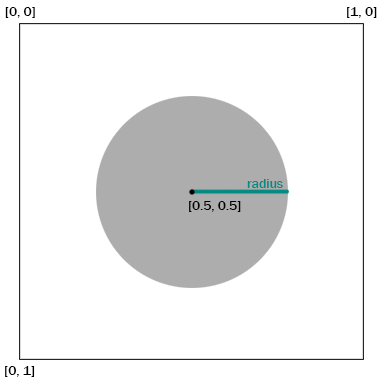 Basic circle drawing
My starting constraints were that all drawing should be done within the shader, and it should render within [0,1] UV space. So I figured circles were a good place to start.
Rendering circles in a shader is relatively easy. Below is the most basic example. We first have to receive a texture coordinate value from the vertex shader so that we know where the current fragment resides in UV space. Then we define where the center of our circle should be, in this case at [0.5, 0.5] in the very middle. The last value we need is the radius of the circle which will tell us how far from the center we should be drawing pixels. Then it’s just a simple distance check between the current fragment position (vTexCoord) and the center of the circle (circleCenter). If the distance is within our radius value then we know we’re in the circle and should color this pixel, otherwise we’re outside the circle and should not color this pixel.
It’s pretty simple stuff but it’s the basis for this whole shader.
Basic circle drawing
My starting constraints were that all drawing should be done within the shader, and it should render within [0,1] UV space. So I figured circles were a good place to start.
Rendering circles in a shader is relatively easy. Below is the most basic example. We first have to receive a texture coordinate value from the vertex shader so that we know where the current fragment resides in UV space. Then we define where the center of our circle should be, in this case at [0.5, 0.5] in the very middle. The last value we need is the radius of the circle which will tell us how far from the center we should be drawing pixels. Then it’s just a simple distance check between the current fragment position (vTexCoord) and the center of the circle (circleCenter). If the distance is within our radius value then we know we’re in the circle and should color this pixel, otherwise we’re outside the circle and should not color this pixel.
It’s pretty simple stuff but it’s the basis for this whole shader.
in vec2 vTexCoord;
out vec4 fragColor;
void main( void )
{
// Fill background
fragColor = vec4(0,0,0,0);
// Circle parameters
float circleRadius = 0.25;
vec2 circleCenter = vec2(0.5);
vec4 circleColor = vec4(1,0,0,1);
// Distance check
if(distance(vTexCoord, circleCenter) <= circleRadius)
{
fragColor = circleColor;
}
}
Layering
 Layering simple shapes
I’ve moved the circle drawing code into its own function so we can call it to draw circles for us at any point in the shader and to clean things up.
Next I had to figure out what parts of the eye were essential to draw. Starting from the back we have the sclera (the white part), the iris (the colored part), the pupil (the black part) and the eyelid (the ...skin part?). These are all just different colored circles so it should work perfectly.
Layering simple shapes
I’ve moved the circle drawing code into its own function so we can call it to draw circles for us at any point in the shader and to clean things up.
Next I had to figure out what parts of the eye were essential to draw. Starting from the back we have the sclera (the white part), the iris (the colored part), the pupil (the black part) and the eyelid (the ...skin part?). These are all just different colored circles so it should work perfectly.
in vec2 vTexCoord;
out vec4 fragColor;
vec4 drawCircle(float radius, vec2 center, vec4 color)
{
if(distance(vTexCoord, center) <= radius)
{
return color;
}
return fragColor;
}
void main( void )
{
// Fill background
fragColor = vec4(0,0,0,0);
// Circle parameters
float circleRadius = 0.25;
vec2 circleCenter = vec2(0.5);
vec4 circleColor = vec4(1,0,0,1);
// fragColor = drawCircle(circleRadius, circleCenter, circleColor);
// Draw sclera
// Draw iris
// Draw pupil
// Draw eyelid
}
Note: in the GLSL code shown here I’ve hardcoded all the parameters for size, shape and color, but in reality you’ll want to expose these as uniforms so you can tweak the eye in real time.
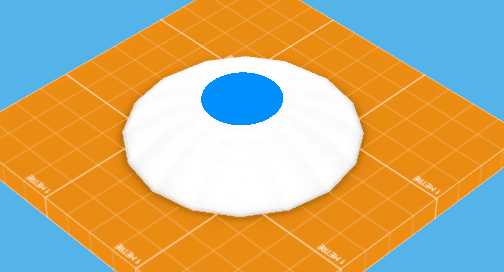
Sclera
 Changing the sclera squeeze value
After we’ve filled our pixel with a default value (zero alpha in this case) we want to fill in the traditionally white part of the eye. But already our drawCircle function is limiting us. If you want giant round eyes all the time it’s fine, but we want variations. I want to be able to have thin, slit looking snake eyes! So we add an extra parameter to our function called “squeeze”. What this will do is allow us to confine the circle to a smaller space in a single dimension so that we get more of a geometric lens shape. Note that this is different from scaling the circle, which would give us a rounder ellipse shape.
Now we can squeeze our circles. This will come in very handy when we start blinking.
Changing the sclera squeeze value
After we’ve filled our pixel with a default value (zero alpha in this case) we want to fill in the traditionally white part of the eye. But already our drawCircle function is limiting us. If you want giant round eyes all the time it’s fine, but we want variations. I want to be able to have thin, slit looking snake eyes! So we add an extra parameter to our function called “squeeze”. What this will do is allow us to confine the circle to a smaller space in a single dimension so that we get more of a geometric lens shape. Note that this is different from scaling the circle, which would give us a rounder ellipse shape.
Now we can squeeze our circles. This will come in very handy when we start blinking.
vec4 drawCircle(float radius, vec2 center, vec4 color, float squeeze)
{
// Find which side of the squeeze this fragment is on
float squeezeDirection = (vTexCoord.x < center.x) ? -squeeze : squeeze;
// Multiply by radius to keep the squeeze relative in size
squeezeDirection *= radius;
ifdistance(vTexCoord, center + squeezeDirection)dist <= radius)
{
return color;
}
return fragColor;
}
// Draw sclera
vec4 scleraColor = vec4(1.0);
float scleraSqueeze = 0.1;
fragColor = drawCircle(vec2(0.5), 0.5, scleraColor, scleraSqueeze);
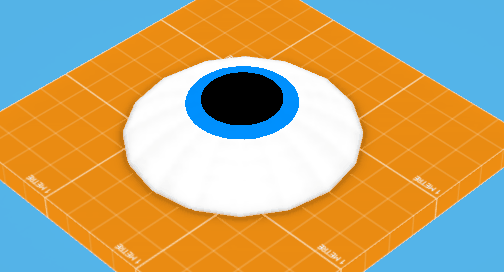
Iris
 Altering the iris radius and pupil position by hand
The iris is very similar except now we’re taking into account a dynamic position. Since the iris is visually “connected” to the pupil we want them to move together so we just use the pupilPosition value to draw the iris. You’ll notice that for the radius we use a combination of pupilRadius and irisRadius. This helps the iris to scale in relation to the pupil if we adjust the size of the latter. Otherwise the iris would start to disappear as we scaled up the pupil.
We also use the pupil’s squeeze value so that the iris will squeeze to match the pupil when necessary.
Altering the iris radius and pupil position by hand
The iris is very similar except now we’re taking into account a dynamic position. Since the iris is visually “connected” to the pupil we want them to move together so we just use the pupilPosition value to draw the iris. You’ll notice that for the radius we use a combination of pupilRadius and irisRadius. This helps the iris to scale in relation to the pupil if we adjust the size of the latter. Otherwise the iris would start to disappear as we scaled up the pupil.
We also use the pupil’s squeeze value so that the iris will squeeze to match the pupil when necessary.
// Draw iris
vec4 irisColor = vec4(0.0, 0.0, 1.0, 1.0);
float irisRadius = 0.1;
float pupilSqueeze = 0.0;
float pupilRadius = 0.1;
fragColor = drawCircle(pupilPosition, pupilRadius + irisRadius, irisColor, pupilSqueeze);
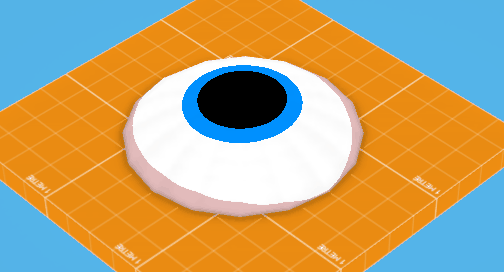
Pupil
 Changing the pupil radius and squeezing, notice the iris follows
Nothing new here. This is almost identical to how we draw the iris, but with the iris radius removed, and the iris color replaced.
Changing the pupil radius and squeezing, notice the iris follows
Nothing new here. This is almost identical to how we draw the iris, but with the iris radius removed, and the iris color replaced.
// Draw pupil
vec4 pupilColor = vec4(0,0,0,1);
float pupilSqueeze = 0.0;
float pupilRadius = 0.1;
fragColor = drawCircle(pupilPosition, pupilRadius, pupilColor, pupilSqueeze);
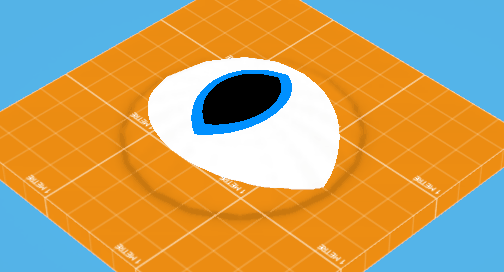
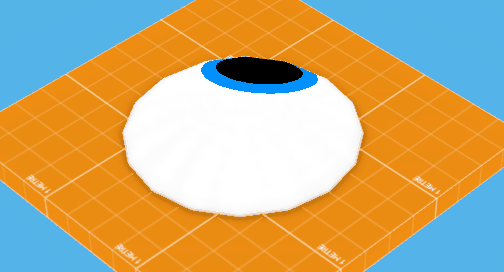
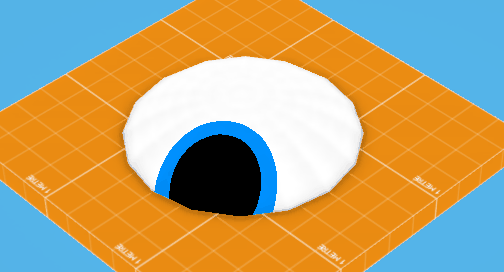
Eyelid
 Eyelid bias works in either direction
The eyelid poses another challenge. So far we’ve just been layering circles over top of each other, but now we need an inverted version. We want to be able to color in the area outside the eyelid radius rather than the interior. This is again a simple modification to our drawCircle function. We add an invert flag which flips the output colors. This way only the pixels which are found to be outside the given radius will be filled, making our eyelid.
Further, I’ve added an in-between function called drawEyelid which takes a bias value. This allows us to shift the center of the eyelid up or down. This way we can create droopy eyelids that hang low or super shifty paranoid eyes with really high lower lids.
Eyelid bias works in either direction
The eyelid poses another challenge. So far we’ve just been layering circles over top of each other, but now we need an inverted version. We want to be able to color in the area outside the eyelid radius rather than the interior. This is again a simple modification to our drawCircle function. We add an invert flag which flips the output colors. This way only the pixels which are found to be outside the given radius will be filled, making our eyelid.
Further, I’ve added an in-between function called drawEyelid which takes a bias value. This allows us to shift the center of the eyelid up or down. This way we can create droopy eyelids that hang low or super shifty paranoid eyes with really high lower lids.
vec4 drawCircle(float radius, vec2 center, vec4 color, float squeeze, bool invert)
{
// Find which side of the squeeze this fragment is on
float squeezeDirection = (vTexCoord.x < center.x) ? -squeeze : squeeze;
// Multiply by radius to keep the squeeze relative in size
squeezeDirection *= radius;
ifdistance(vTexCoord, center + squeezeDirection)dist <= radius)
{
return invert ? fragColor : color;
}
return invert ? color : fragColor;
}
vec4 drawEyelid(vec4 color, float squeeze, float bias, float blink)
{
vec2 center = vec2(0.5) + (bias * blink);
return drawCircle(0.5, center, color, squeeze + blink, true);
}
// Draw eyelid
vec4 eyelidColor = vec4(0.86, 0.68, 0.68, 1.0);
float scleraSqueeze = 0.1;
float blink = 0.0;
float eyelidBias = 0.0;
fragColor = drawEyelid(eyelidColor, eyelidBias, scleraSqueeze + blink);
Angle
 Changing angle of pupil and sclera independently
One final parameter addition to our circle function is angle. This requires a bit more code and some trigonometry, but allows us to rotate both the eyelid shape as well as the pupil + iris for even more variations. The gist of it is we rotate the given texture coordinates before doing our check, which will give us a rotated result.
Changing angle of pupil and sclera independently
One final parameter addition to our circle function is angle. This requires a bit more code and some trigonometry, but allows us to rotate both the eyelid shape as well as the pupil + iris for even more variations. The gist of it is we rotate the given texture coordinates before doing our check, which will give us a rotated result.
vec4 drawCircle(vec2 center, float radius, vec4 color, float squeeze, float angle, bool invert)
{
// Transform input texture coordinates using angle
vec2 uv = vTexCoord;
vec2 fromCenter = (center - uv);
float uvLength = length(fromCenter);
float angleFromCenter = atan(fromCenter.y, fromCenter.x) - angle;
uv.x = cos(angleFromCenter) * uvLength;
uv.y = sin(angleFromCenter) * uvLength;
uv += center;
float squeezeDirection = (uv.x < center.x) ? -squeeze : squeeze;
squeezeDirection *= radius;
// Create the new offset coordinate
vec2 squeezeAngled = vec2(cos(angle), sin(angle)) * squeezeDirection;
if(distance(vTexCoord, center + squeezeAngled) <= radius)
{
return invert ? fragColor : color;
}
return invert ? color : fragColor;
}
Behaviour
 Shifty
One of the advantages of doing all this drawing dynamically, aside from being able to tweak it in real time, is that we can control the behaviour of the eye just by sending in control values.
By moving the pupilPosition around and interpolating from 0.0 to 1.0 for the eyelid squeeze value we can make an eyeball that gazes around and blinks on its own. By using long or short values for the duration of blinks or the delay between looking around you can create a surprising amount of personality with a single eye.
To make it even more self-contained you could calculate a blink value in the vertex shader (based on a time value you send in) and send that to the fragment shader. That way you have a fully dynamic eyeball just stored in a shader.
Shifty
One of the advantages of doing all this drawing dynamically, aside from being able to tweak it in real time, is that we can control the behaviour of the eye just by sending in control values.
By moving the pupilPosition around and interpolating from 0.0 to 1.0 for the eyelid squeeze value we can make an eyeball that gazes around and blinks on its own. By using long or short values for the duration of blinks or the delay between looking around you can create a surprising amount of personality with a single eye.
To make it even more self-contained you could calculate a blink value in the vertex shader (based on a time value you send in) and send that to the fragment shader. That way you have a fully dynamic eyeball just stored in a shader.
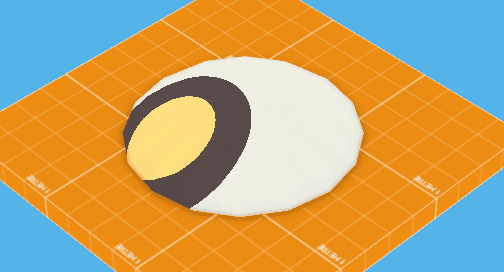
Randomize
 Cylcing randomly generated parameters
At this point when I made the shader I had a daunting list of parameters to tweak. It’s really great to have so much control, but at a certain point it can become paralyzing. To help explore what this shader could do I created a “randomize” button in my editor which would set random values to all the parameters (within sane bounds). This was hugely helpful to discover some of the different things this system could do.
That’s the "how-to" part finished. I hope it was helpful! Below are a few extra things that can be done once you’ve got an eye shader written.
Cylcing randomly generated parameters
At this point when I made the shader I had a daunting list of parameters to tweak. It’s really great to have so much control, but at a certain point it can become paralyzing. To help explore what this shader could do I created a “randomize” button in my editor which would set random values to all the parameters (within sane bounds). This was hugely helpful to discover some of the different things this system could do.
That’s the "how-to" part finished. I hope it was helpful! Below are a few extra things that can be done once you’ve got an eye shader written.
Extras
Palettes
 Randomized from a palette
Randomizing all the parameters was great for finding neat behaviours but a lot of the time it fell victim to the “random color” palette. When you just use fully random colors across a number of objects by definition you get a gray average color made up of unexciting desaturated pastel values punctuated by overly bright whites and total blacks.
I already had a color palette resource type that I was using for vertex coloring regular assets, so I generalized it so it could be loaded and queried by any entity. Now when I create an eye I can point it to a specific palette and it will randomize itself based on the colors provided.
Randomized from a palette
Randomizing all the parameters was great for finding neat behaviours but a lot of the time it fell victim to the “random color” palette. When you just use fully random colors across a number of objects by definition you get a gray average color made up of unexciting desaturated pastel values punctuated by overly bright whites and total blacks.
I already had a color palette resource type that I was using for vertex coloring regular assets, so I generalized it so it could be loaded and queried by any entity. Now when I create an eye I can point it to a specific palette and it will randomize itself based on the colors provided.
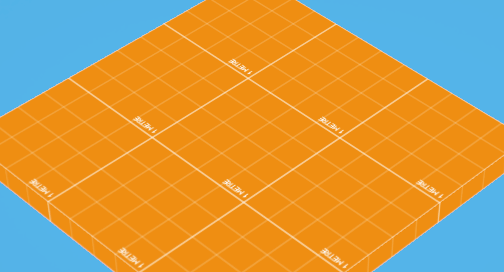
Meshes
Since the shader only relies on texture coordinates to tell it where to draw there are a lot of neat things you can do when you apply it to meshes. Planar UV map on a sphere
 Multi object mesh
 Two spheres = synced set of eyes
Aliasing
 Softness value taken to the extreme, then something reasonable
One of the issues with doing per-pixel drawing in a shader like this is aliasing. We’re used to polygons being flat colored or textured where sampling and mipmaps solve most of our aliasing issues, but if we’re using MSAA (or no anti-aliasing at all) the edges on our eyeballs are going to look jaggy as hell.
The easiest way to fix this I've found is to just use a very small falloff gradient (similar to the leading edge falloff in my water shader write-up). We just define a softness value which will lerp from one color to the other across a small distance when we’re near the edge of a circle.
Softness value taken to the extreme, then something reasonable
One of the issues with doing per-pixel drawing in a shader like this is aliasing. We’re used to polygons being flat colored or textured where sampling and mipmaps solve most of our aliasing issues, but if we’re using MSAA (or no anti-aliasing at all) the edges on our eyeballs are going to look jaggy as hell.
The easiest way to fix this I've found is to just use a very small falloff gradient (similar to the leading edge falloff in my water shader write-up). We just define a softness value which will lerp from one color to the other across a small distance when we’re near the edge of a circle.
vec4 drawCircle(vec2 center, float radius, vec4 color, float squeeze, float angle, bool invert)
{
...
float dist = distance(vTexCoord, center + squeezeAngled);
float soften = 0.01;
if(dist <= radius)
{
// Lerp between the two colors if this fragment is within the soften boundary
float lerp = clamp((radius - dist) / soften, 0, 1);
return mix(invert ? fragColor : color, invert ? color : fragColor, 1.0-lerp);
}
...
}
Expansion
Attribute increase/decrease
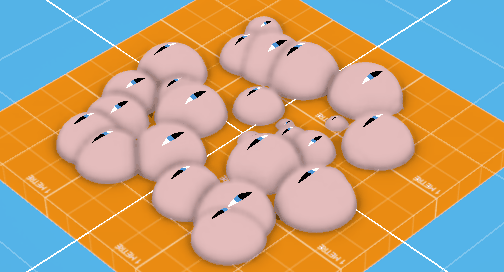
I’d like to continue working on this from a tools perspective. The randomize button was really helpful but I’d like to build more specific tools for adjusting eye properties. Ideally I’d like to have a handful of buttons like “More/less cute” or “More/less nervous” which will amplify or reduce certain predetermined values. Since I already know what values control the different aspects of the eye, why not wrap them up in a simpler package? Menagerie
That’s eye balls! It's a simple but really effective technique. I tried to include as much relevant info as I could, but since I know a lot of people will be using different pipelines I tried to keep it fairly general. If you enjoyed this or found it useful, let me know! If you’ve got any question feel free to reach out to me on twitter at @owendeery. Thanks!
Back to projects
Menagerie
That’s eye balls! It's a simple but really effective technique. I tried to include as much relevant info as I could, but since I know a lot of people will be using different pipelines I tried to keep it fairly general. If you enjoyed this or found it useful, let me know! If you’ve got any question feel free to reach out to me on twitter at @owendeery. Thanks!
Back to projects
@owendeery owen.deery@gmail.com